![[RS] Rogue Soldiers Clan](https://rsclan.gg/assets/images/rs_logo.png)
This guide explains the standard procedure for creating official
[RS] Rogue Soldiers Clan events using
Sesh.
Before starting, sign in to Sesh using your Discord account and
select the [RS] Rogue Soldiers Clan Discord server.
The goal of this process is to make sure events are configured
consistently, use the correct roles and voice channels, notify the
right members, and integrate properly with Discord's native event
system.
Before You Begin
Before creating an event, make sure you know:
- Which game or activity the event is for.
- The date and start time.
- Which voice channel will be used.
- Which game or activity role should receive the initial announcement.
- Which attendee role should be assigned to members who RSVP.
- Who is responsible for hosting the event.
- Whether an existing Sesh template already exists.
If a template exists, use it whenever practical. Templates reduce
configuration mistakes and help keep official [RS] events consistent.
Step 1 — Select Create Event
After opening the Sesh dashboard for the [RS] Discord server:
- Locate the main navigation or menu.
- Select Create Event.
This opens the event creation interface.
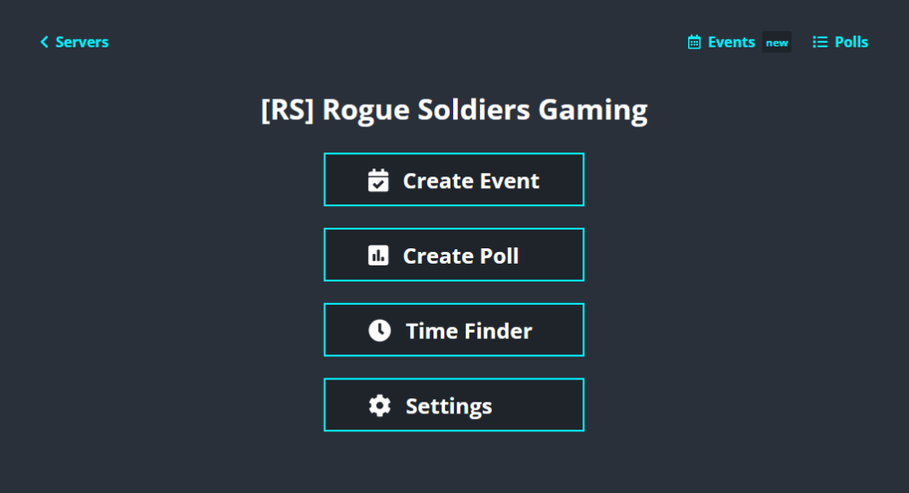
Select Create Event from the Sesh dashboard.
Step 2 — Check for an Existing Template
Before manually configuring the event, check whether a template
already exists for the game, activity, or event type.
Templates help ensure that:
- The correct roles are selected.
- Event notifications are configured properly.
- Event images are already assigned where applicable.
- Discord integrations are enabled correctly.
- Events use consistent [RS] formatting.
Open the Template selector and review the available
options before configuring the event manually.
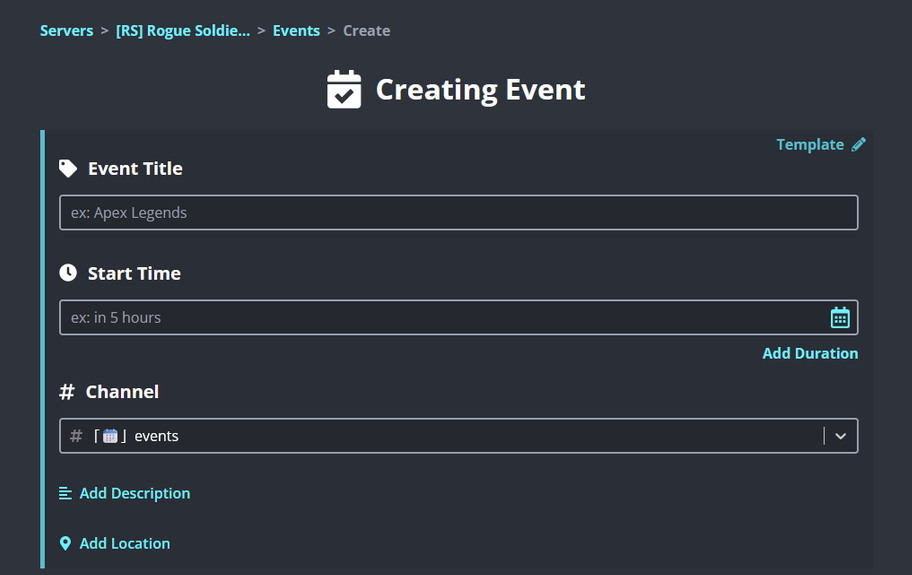
Check the available templates before configuring the event manually.
Step 3 — Select the Appropriate Template
If a template exists for the game or activity:
- Select the appropriate template.
- Verify that it matches the correct game or event type.
- Review the populated settings rather than assuming every field is still correct.
If no suitable template exists, continue creating the event manually.
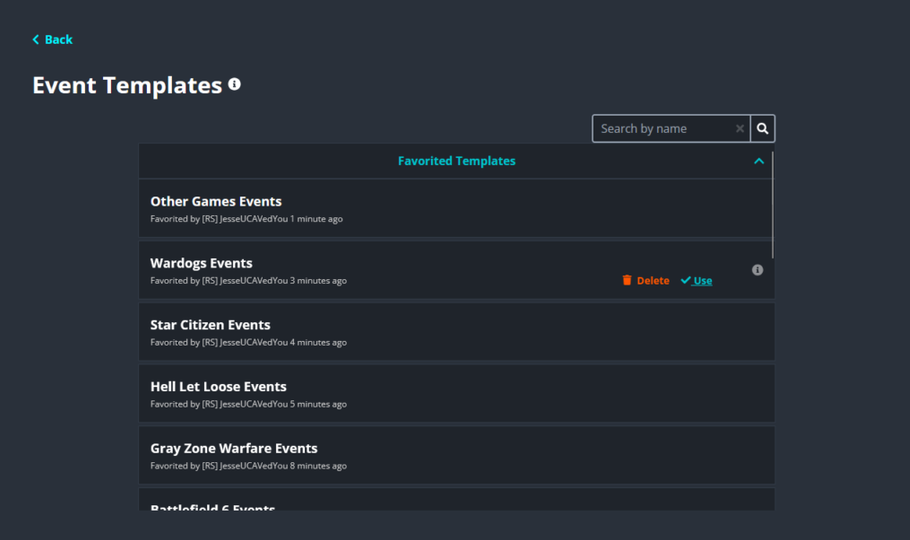
Select the template that matches the game or event being created.
Step 4 — Enter the Event Title
Create a clear and descriptive title that immediately tells members
what the event is.
A good event title should identify:
- The game or activity.
- The type of event.
- Important mode, format, or participation information when relevant.
Good Title Examples
- BattleBit Community Night
- Hell Let Loose: Vietnam Launch Party
- Ardem PvP Squad Operations
- 7 Days to Die Blood Moon Night
Avoid vague names such as Game Night,
Event, or Come Play when a more
descriptive title can be used.
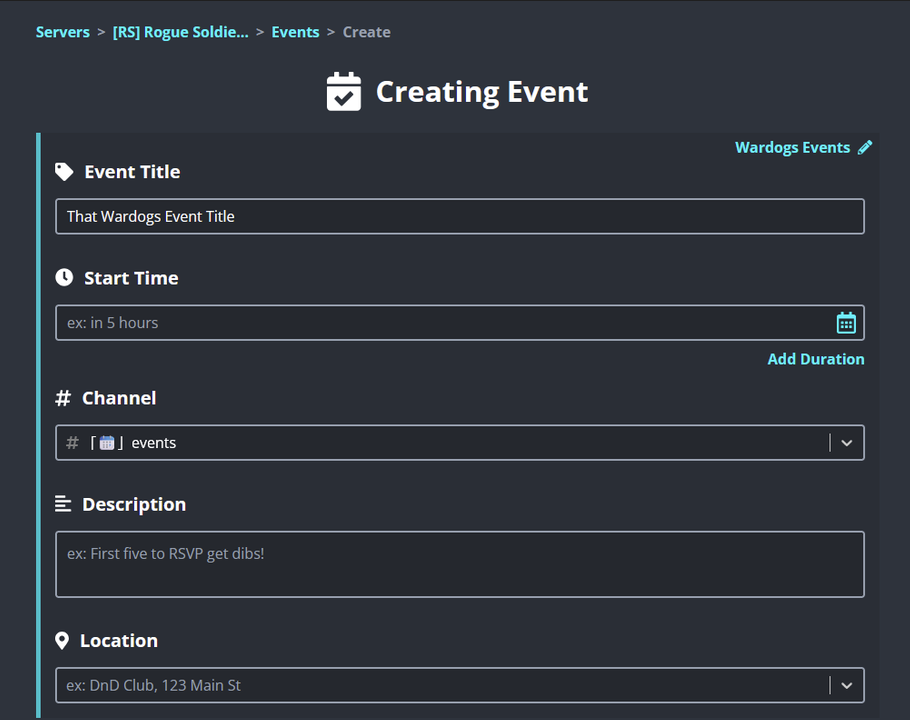
Enter a title that clearly identifies the game and activity.
Step 5 — Choose the Event Date & Time
Select the correct:
- Event date.
- Start time.
- Time zone, when applicable.
Double-check the scheduling information before continuing.
Make sure the event:
- Does not conflict with another major [RS] event.
- Gives members reasonable notice.
- Matches any promotional graphics or announcements that have already been published.
- Uses the intended time zone and does not rely on manually typed time conversions where Sesh can handle them automatically.
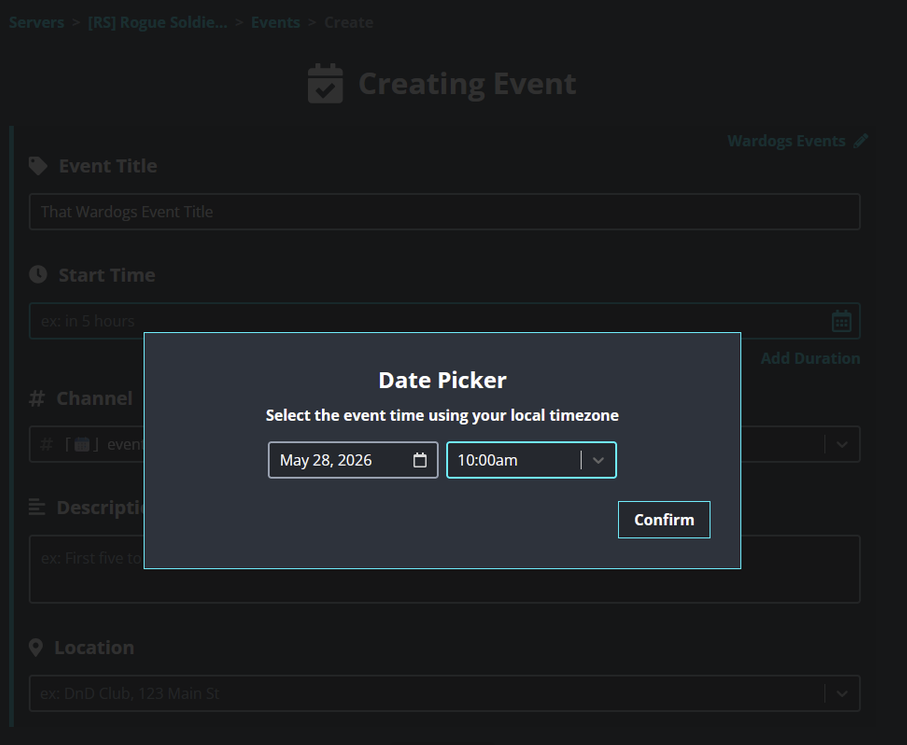
Verify the event date and start time before continuing.
Step 6 — Enter the Description & Location
The event description should give members enough information to
decide whether they want to participate and prepare before the
event begins.
Include:
- What the event is.
- What participants will be doing.
- Any participation requirements.
- Anything members should install, download, or prepare beforehand.
- Special rules, restrictions, or event-specific details.
Keep the description clear and useful. It should explain the event
without requiring members to search through Discord for basic
participation information.
Event Location
The location should be the designated [RS] voice channel for the
event.
Before selecting the voice channel:
- Verify that the channel is appropriate for the game or activity.
- Confirm that another event is not already scheduled to use the same channel at the same time.
Avoiding voice-channel conflicts is especially important when
multiple community events are scheduled on the same day.
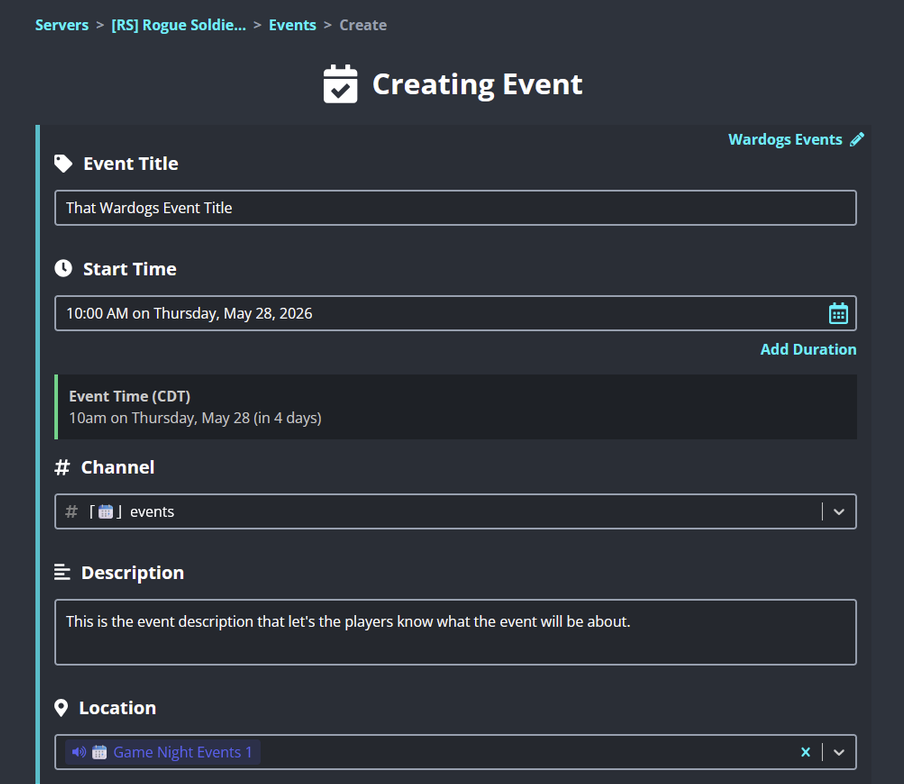
Configure the event description and select the correct voice channel.
Step 7 — Configure Notifications & Roles
Proper role configuration is important because it determines who
sees the initial event announcement and who receives later reminders.
If you are using an established template, these settings should
already be configured. Verify them before continuing.
Mentions on Event Create
Set Mentions on Event Create to the primary role
associated with the game or activity.
Examples include:
- BattleBit role.
- Hell Let Loose: Vietnam role.
- Ardem role.
This announcement is intended to reach members who have chosen to
receive information for that game.
Mentions on Event Start
Set Mentions on Event Start to the attendee role
associated with the event.
This allows later notifications to target members who actually
expressed interest in attending instead of repeatedly notifying
the entire game role.
Step 7A — Customize Notifications
Select Customize Notifications.
A reminder approximately 10 minutes before the event
begins is recommended.
That reminder should:
- Ping the attendee role.
- Remind participants that the event is about to begin.
- Encourage members to start gathering in the designated voice channel.
A short pre-event reminder improves turnout without repeatedly
pinging members who never RSVP'd.
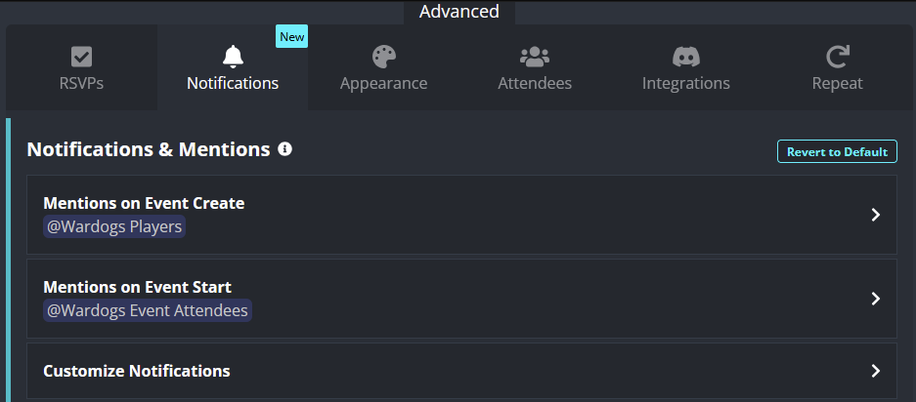
Configure the event's role mentions and notification behavior.
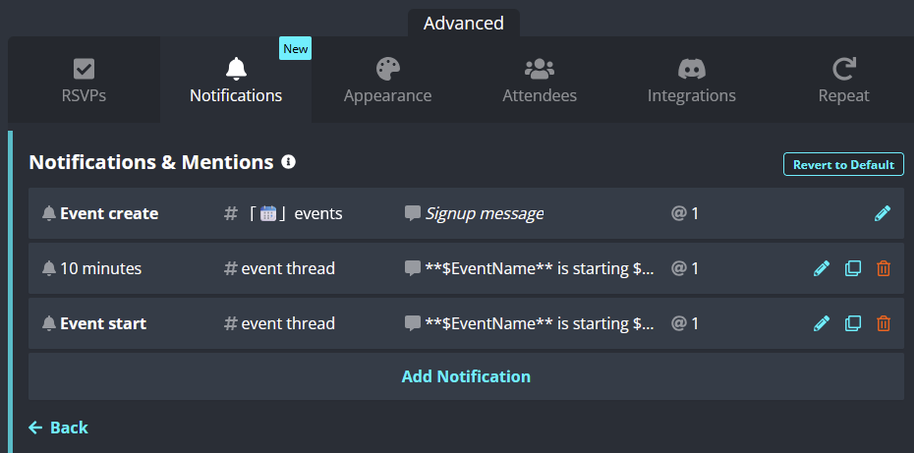
Add a pre-event attendee reminder when appropriate.
Step 8 — Add an Event Image
Add an appropriate image URL for the event.
The image:
- Appears with the event post.
- Helps members visually identify the event.
- Makes event announcements easier to distinguish in Discord.
When using a template, an event image may already be configured.
Verify that it is still appropriate.
The same image should also be used for the Discord native event
when native event mirroring is enabled.
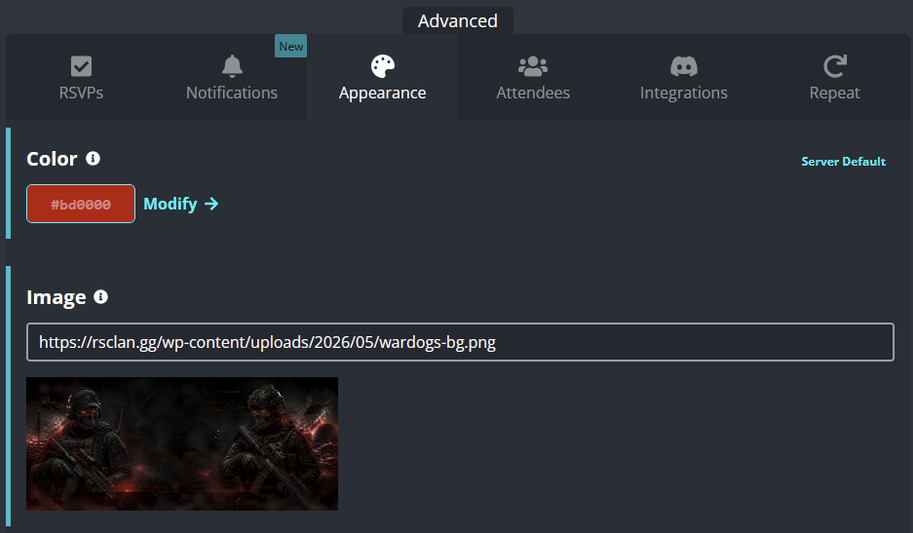
Add or verify the image used to identify the event.
Step 9 — Configure the Attendee Role
Locate the Add Role to Attendees setting.
Select the attendee role associated with the primary game or
activity role selected earlier.
Also make sure:
- Add role on User RSVP is enabled.
This setting is important because it:
- Automatically assigns the attendee role to members who RSVP.
- Allows reminders and later notifications to target only members who indicated that they are interested.
Double-check the selected role before continuing. Using the wrong
attendee role can cause unrelated members to receive event notifications.
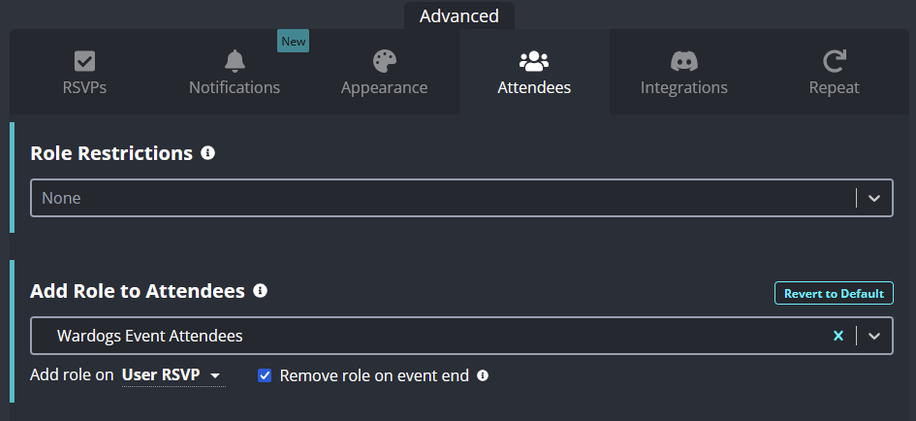
Select the proper attendee role and enable automatic assignment on RSVP.
Step 10 — Configure Discord Integration
Several Sesh integration settings should be enabled so the event
works properly with Discord.
Verify that the following are enabled:
- Create Thread for Event
- Mirror to Discord Native Event
If an established template is being used, these options should
normally already be enabled. Verify them anyway.
The event image URL may also appear within this section. Make sure
it matches the image selected earlier.
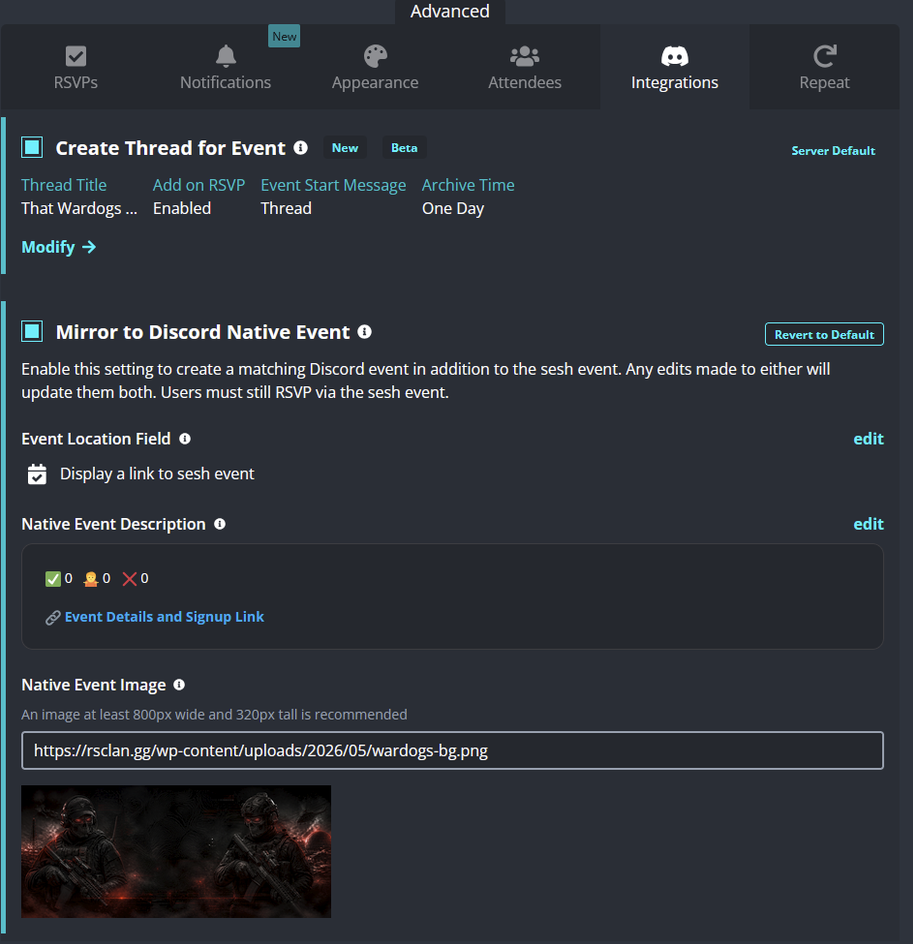
Enable thread creation and Discord native event mirroring.
Step 10A — Configure the Native Event Location
Under the Discord native event settings:
- Select Edit.
- Set the native Discord event location to the same voice channel selected earlier in the Sesh event configuration.
The two locations should match.
If they do not:
- Members may be directed to the wrong voice channel.
- The Sesh event and native Discord event may provide conflicting participation information.
Always verify both locations before publishing the event.
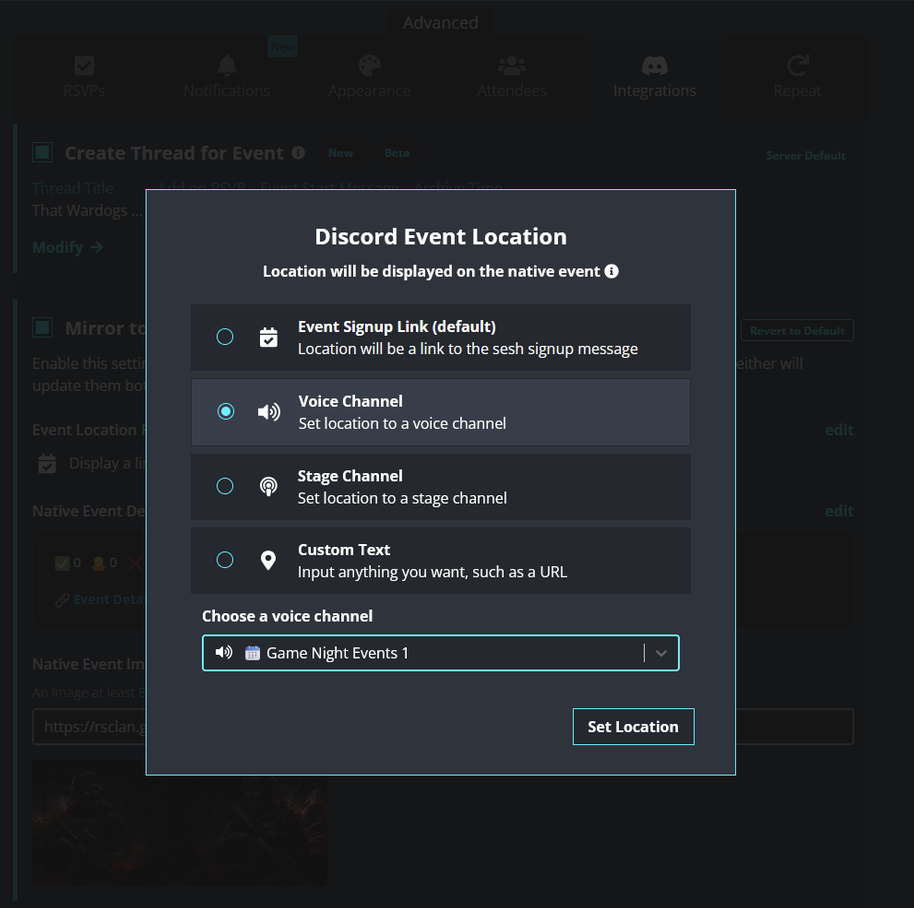
Set the Discord native event location to the same voice channel used by Sesh.
Step 10B — Configure the Native Event Description
Review and edit the description that will appear on the native
Discord event.
You can:
- Reuse the main Sesh event description.
- Use a shortened version when the original is unnecessarily long for the native event listing.
The native Discord event should still clearly explain:
- What the event is.
- What participants should expect.
- Important requirements or participation details.
The Sesh event and native Discord event should provide consistent
information.
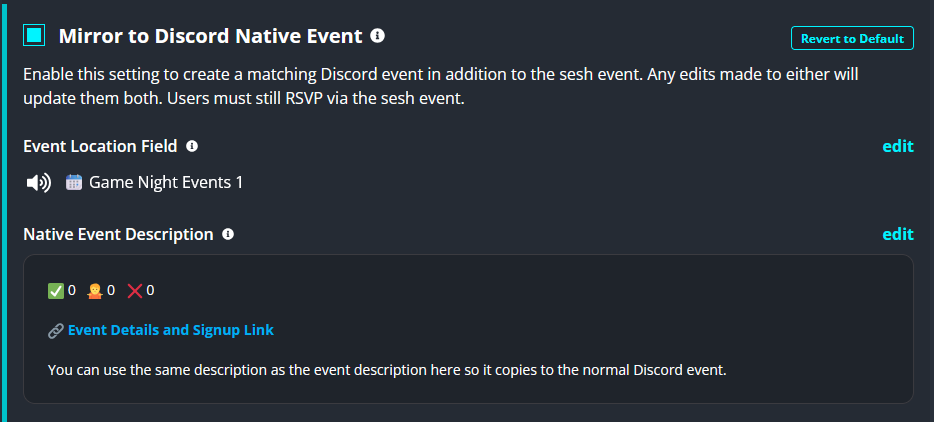
Review the description that will appear in the Discord native event.
Step 11 — Optional: Recurring Events
Sesh supports recurring events, but they should only be used when
the activity is genuinely predictable.
Recurring events are generally not ideal when:
- Event details frequently change.
- Voice channels may change.
- Images or descriptions need regular updates.
- Notification settings differ from one event to the next.
- The host or event format is not guaranteed each occurrence.
Recurring events work best for activities that remain mostly
identical each time they occur.
Appropriate Recurring Event Examples
- Weekly tournaments with a fixed schedule.
- Scheduled training sessions.
- Routine game nights with a consistent format.
- Regular seeding sessions when the schedule is stable.
If recurrence is enabled, carefully verify the recurrence schedule
before saving the event.
Final Review Checklist
Before publishing the event, verify every important configuration
item.
- Correct event title.
- Correct date and start time.
- Correct voice channel selected.
- No known voice-channel conflict.
- Correct primary game or activity role selected.
- Correct attendee role selected.
- Add Role on User RSVP enabled.
- Initial notification configured properly.
- Attendee reminders configured properly.
- Event image added and verified.
- Create Thread for Event enabled.
- Mirror to Discord Native Event enabled.
- Native event location matches the Sesh location.
- Native event description is complete.
After Publishing
Creating the event is not the final step. Confirm that everything
was generated correctly.
Verify that:
- The Sesh event post appears correctly.
- The Discord native event was created successfully.
- The event title, image, date, time, and location are correct.
- The expected role notification was sent.
- RSVP and attendee-role behavior are configured correctly.
- The event thread was created successfully.
If something is incorrect, fix it as soon as possible so members
are not working from conflicting event information.
Staff Standard
Official [RS] events should be easy for members to understand and
easy for staff to support.
Using established templates, checking roles carefully, keeping
Sesh and Discord event information synchronized, and reviewing the
finished event after publishing prevents most common problems.
Configure it carefully, verify it before publishing, and check
the finished event afterward.